So you want to give Android development a go, but don’t know where to start? That’s easy – start by setting up a development environment of course!
STEP 1 – Install Java Development Kit
Android development requires at least JDK 6 (note JRE alone is insufficient). If you need to install the JDK, you can grab it from Oracle’s website (link to JDK7: http://www.oracle.com/technetwork/java/javase/downloads/jdk7-downloads-1880260.html).
STEP 2 – Add your Java directory to system Path
First, make note of the JDK binary directory (e.g. C:\Program Files\Java\jdk1.7.0_21\bin).
Next go to Control Panel > System and Security > System. Click on “Advanced system settings”:
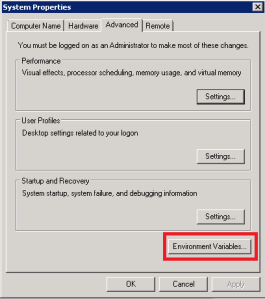
From the “System Properties” popup, click on the “Advanced” tab; from there, click the “Environment Variables” button:
The “Environment Variables” popup has 2 lists of variables, and we are interested in the second list (“System Variables”). Scroll down in the list and highlight the “Path” variable before clicking the “Edit…” button:
The “Edit System Variable” popup will appear. Add a semi-colon to the end of “Variable Value” and then append the directory path for the JDK binary. Note, “append” – do not overwrite! Then click OK.
STEP 3 – Download the Android SDK
Go to http://developer.android.com/sdk/index.html and click on the “Download the SDK” button.
Unzip the downloaded file and run eclipse.exe.
That’s it!


